Welcome to the Heartwarming World of Homemade Pita Bread
Join me, Rafael, on a delightful culinary adventure as we explore the art of making homemade pita bread. With just a handful of ingredients, you can create warm, fluffy pockets that are perfect for sharing and celebrating with loved ones. Let’s bring the Mediterranean spirit into our kitchens!
Why You’ll Love This Recipe
- Simple Ingredients: This recipe uses just five basic ingredients, making it accessible for everyone, even beginners.
- Fast and Fun: In less than an hour, you can have fresh pita bread ready to enjoy, perfect for a spontaneous meal.
- Versatile Uses: From sandwiches to dipping, these pitas can elevate any dish or be enjoyed on their own.
- Healthier Option: Homemade pita is healthier than store-bought, allowing you to control the ingredients and avoid preservatives.
- Family Activity: Making pita bread can be a fun activity for the whole family, fostering togetherness and creativity in the kitchen.
Ingredients for Perfect Pita Bread
Let’s break down the ingredients you’ll need to make this delightful pita bread:
- 1 cup warm water (237g): This activates the yeast, ensuring a lovely rise.
- 2 1/4 teaspoons instant yeast (1 packet): The star of our show, providing that perfect puff.
- 1 teaspoon granulated sugar: A touch of sweetness that helps the yeast thrive.
- 1 teaspoon fine sea salt: Balances the flavors and enhances the bread.
- 1 Tablespoon olive oil: Adds richness and moisture to the dough.
- 2 ¼ cups all-purpose flour (281g): The base for our dough, creating that lovely texture.
If you’re looking for substitutions, you can use whole wheat flour for a healthier twist or gluten-free flour for a gluten-free option. Just ensure to adjust the water content accordingly.
How to Make Pita Bread: A Step-by-Step Guide
Now, let’s dive into the steps to create your own fluffy pita bread:
- Make Dough: In a large bowl, mix the warm water, yeast, sugar, salt, olive oil, and 1 cup of flour. Gradually add more flour until the dough comes together but remains slightly sticky. Knead in the bowl for about a minute until smooth.
- Rest: Transfer the dough to a well-greased bowl, cover it with a clean kitchen towel, and let it rest for 40 minutes. You can also refrigerate it until you’re ready to use it.
- Divide Dough: Once rested, divide the dough into 8 equal pieces. Roll each piece into a thin circle, about 1/4 inch thick.
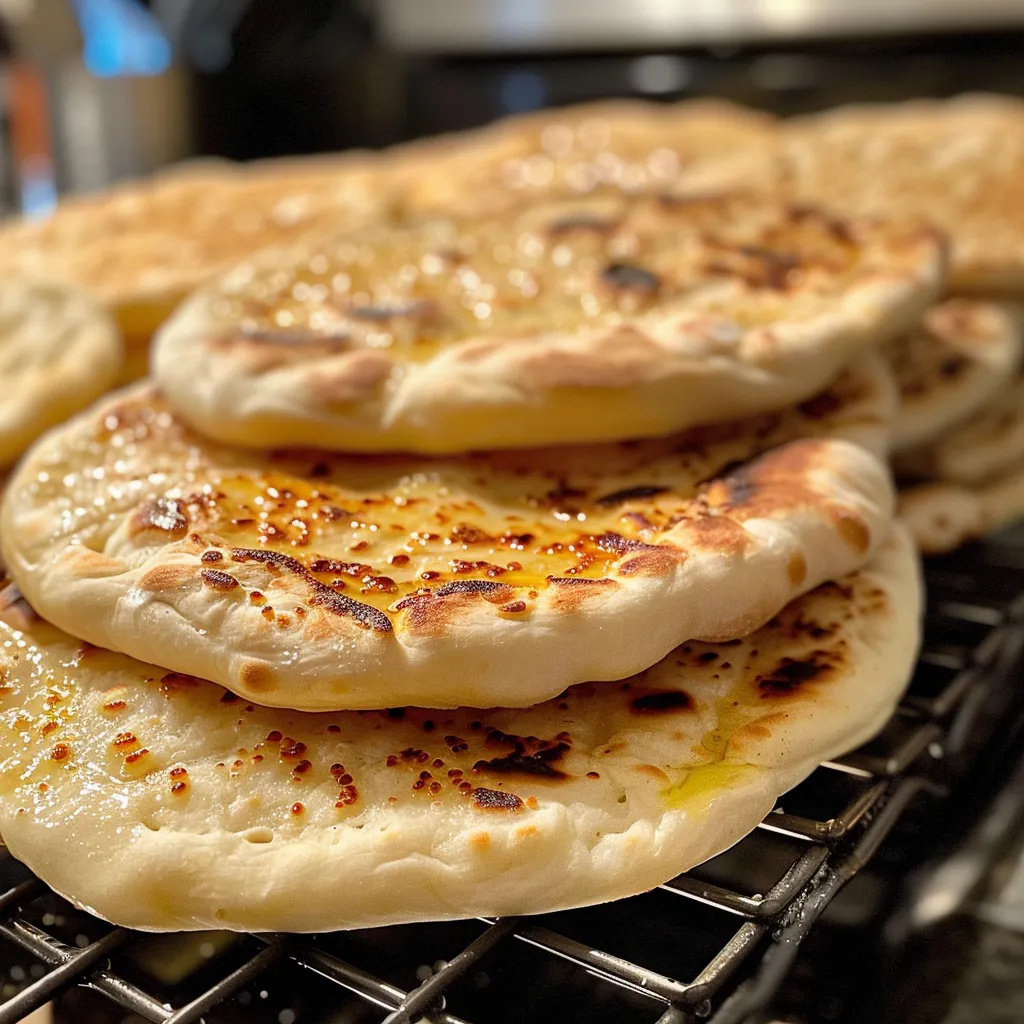
- Cook: Heat a griddle or large skillet over medium-high heat. Lightly grease the pan, then lay the pitas flat. Cook for about 2 minutes until lightly golden, then flip and cook for another minute. Remove and keep warm under a kitchen towel.
- Store: Leftover cooked pitas can be stored in an airtight container at room temperature for 2-3 days, in the fridge for up to 5 days, or frozen for later use.
Pro Tips for Fluffy Pita Bread
Here are some expert insights to ensure your pita bread is nothing short of perfection:
- Stickiness is Good: Don’t be afraid of a slightly sticky dough; this ensures a tender pita.
- High Heat: Ensure your cooking surface is hot enough to get that perfect puff.
- Roll Thin: The thinner you roll your dough, the puffier the pita will be.
- Cover to Keep Warm: Always keep your cooked pitas wrapped in a towel to maintain their warmth and softness.
- Experiment with Flavors: Try adding herbs or spices to the dough for a unique twist!
- Don’t Overcrowd the Pan: Cook in batches to avoid steaming instead of baking.
- Use a Pizza Stone: If you have one, a pizza stone can help achieve an even higher heat.
- Check Your Yeast: Ensure your yeast is fresh for the best rise.
Common Mistakes and Troubleshooting
Even the best of us may encounter a hiccup or two. Here are some common mistakes and how to fix them:
- Dough Not Rising: If your dough doesn’t rise, your yeast may be dead. Always check the expiration date.
- Pitas Not Puffing: Ensure your cooking surface is hot enough. If not, the moisture in the dough will escape instead of creating steam.
- Dry Pitas: If your pitas turn out dry, try adding a touch more olive oil to your dough next time.
- Uneven Cooking: Rotate your pitas halfway through cooking to ensure even browning.
Delicious Variations of Pita Bread
Why not get adventurous? Here are some variations to try:
- Whole Wheat Pitas: Substitute half or all the all-purpose flour with whole wheat flour for a nuttier flavor.
- Herbed Pitas: Add dried herbs like oregano or rosemary into the dough for added flavor.
- Spiced Pitas: Incorporate spices like cumin or coriander for a Middle Eastern twist.
- Stuffed Pitas: Fill your pitas with cheese or cooked vegetables before cooking for a delightful surprise!
Storage and Make-Ahead Instructions
Planning ahead? Here’s how to store and prepare your pitas:
- Make Ahead: You can prepare the dough a day in advance; just refrigerate it and let it come to room temperature before rolling out.
- Freezing: Freeze cooked pitas separated by parchment paper in an airtight container. Reheat in the oven or skillet when ready to enjoy.
- Room Temperature Storage: Keep cooked pitas wrapped in a clean towel or in a bread box for up to 2-3 days.
Nutritional Tips and Dietary Adaptations
This recipe can cater to various dietary needs:
- Gluten-Free Option: Use a gluten-free all-purpose flour blend to make this recipe gluten-free.
- Low-Carb Variation: Try using almond flour or coconut flour for a low-carb alternative.
- Vegan Friendly: This recipe is naturally vegan; just ensure your other ingredients align with your dietary preferences.
Essential Equipment for Making Pita Bread
To make the process smooth and enjoyable, consider having the following equipment handy:
- Mixing Bowls: A large bowl for mixing the dough.
- Rolling Pin: To roll out your dough into thin circles.
- Griddle or Skillet: A heavy-bottomed skillet or griddle for even cooking.
- Kitchen Towel: To keep your pitas warm post-cooking.
Serving Suggestions for Your Delicious Pita Bread
Now that you’ve made your pita bread, here are some delightful ways to serve it:
- Classic Gyros: Fill with sliced meats, tzatziki sauce, and fresh veggies for a hearty meal.
- Hummus and Veggies: Pair with homemade hummus and a platter of fresh vegetables for a healthy snack.
- Wraps: Use as a wrap for grilled chicken, falafel, or any of your favorite fillings.
- Chips: Cut leftover pitas into triangles, brush with olive oil, and bake them for delicious pita chips.
Frequently Asked Questions
Here are some common questions about making pita bread:
- Can I use active dry yeast instead of instant yeast? Yes, just activate it in warm water with sugar before mixing it into the dough.
- Why didn’t my pitas puff? This can happen if the pan isn’t hot enough or if the dough was rolled too thick.
- How can I tell if my pitas are done? They should be lightly golden on both sides and puffed up.
- What’s the best way to reheat pita bread? Warm in a dry skillet or oven until just heated through.
- Can I add ingredients to the dough? Absolutely! Herbs and spices can enhance the flavor significantly.
- How long can I store homemade pita bread? Store at room temperature for 2-3 days or in the fridge for up to 5 days.
- Can I freeze pita bread? Yes, just ensure you separate them with parchment paper and store in an airtight container.
- Is this recipe suitable for children? Yes! Kids can join in rolling and shaping the dough for a fun family activity.
Conclusion: Bring Mediterranean Joy to Your Table
Making homemade pita bread is more than just a recipe; it’s a celebration of flavors and cultures. The warmth of freshly baked bread, the joy of sharing it with loved ones, and the satisfaction of creating something from scratch are what it’s all about. So roll up your sleeves, gather your ingredients, and let’s create some kitchen magic together!
Pita Bread
Ingredients
Dough
- 1 cup warm water
- 2 1/4 teaspoons instant yeast (1 packet)
- 1 teaspoon granulated sugar
- 1 teaspoon fine sea salt
- 1 Tablespoon olive oil
- 2 ¼ cups all-purpose flour
Instructions
- Mix water, yeast, sugar, salt, olive oil, and 1 cup of flour. Add more flour until dough is soft and slightly sticky. Knead until smooth.
- Place dough in a greased bowl, cover, and rest for 40 minutes or refrigerate.
- Divide dough into 8 pieces and roll into thin circles.
- Heat a skillet over medium-high heat, lightly oil, and cook pitas 2 minutes per side until golden.
- Keep cooked pitas warm in a towel. Store leftovers in an airtight container.