Discover the Joy of Homemade Hummus
Welcome to the vibrant world of homemade hummus, where each creamy scoop invites family and friends to gather and share in the joy of Mediterranean flavors. This recipe is not just about mixing a few ingredients; it’s about crafting a dish that transforms any meal into a celebration. Hummus is versatile, nutritious, and oh-so-delicious, making it a perfect addition to any table. Let’s dive into the details, shall we?
Why You’ll Love This Recipe
- Quick and Easy: With just a few simple steps, you can whip up a batch of hummus in under 15 minutes.
- Nutritious and Healthy: Packed with protein and fiber from chickpeas, this hummus is a guilt-free indulgence.
- Customizable: Tailor this recipe to your taste by adding spices, herbs, or even roasted vegetables.
- Perfect for Any Occasion: Whether it’s a casual snack, a party appetizer, or a side dish, hummus fits right in.
- Great for Meal Prep: Make a big batch to enjoy throughout the week—hummus keeps well in the fridge!
Ingredients You’ll Need
Let’s take a closer look at the essential ingredients that make this homemade hummus a hit:
- Chickpeas: Two 15-ounce cans of chickpeas, drained and rinsed. Skins can be removed for extra creaminess.
- Tahini: 1/4 cup of good-quality tahini, which adds a rich, nutty flavor.
- Lemon Juice: 1 tablespoon plus 2 teaspoons for brightness.
- Sea Salt: 3/4 teaspoon to enhance the flavors.
- Garlic: 3 cloves, minced for that aromatic kick.
- Olive Oil: 1/3 cup, plus more for drizzling—use a flavorful one for the best taste.
- Ground Cumin: 1/4 teaspoon for warmth.
- Paprika: 1/4 teaspoon to sprinkle on top for color.
- Chopped Parsley: Optional, but it adds a fresh touch as a garnish.
- Pita Bread: Wedges or pita chips for serving alongside your hummus.
How to Make Hummus from Scratch
Ready to get started? Follow these simple steps to create your creamy masterpiece:
- In the bowl of a food processor, combine the chickpeas, reserved liquid, tahini, lemon juice, sea salt, and garlic. Process for a couple of minutes, scraping down the sides as needed.
- With the processor running, slowly drizzle in the olive oil until the mixture becomes creamy and smooth, about 4-5 minutes. You may need to stop and scrape down the sides a few times.
- Spoon the hummus into a serving dish and keep at room temperature or chill until ready to serve.
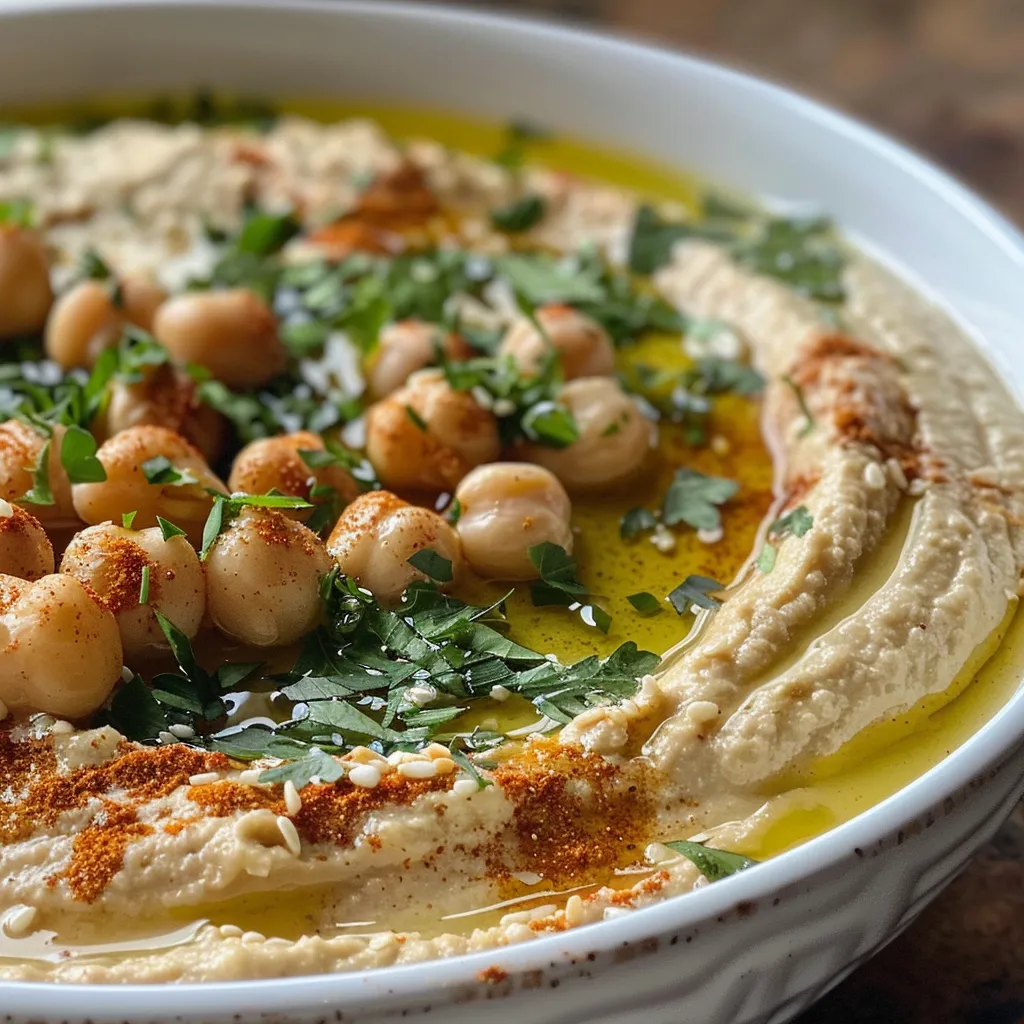
- For a beautiful presentation, create swirls on top, sprinkle with cumin and paprika, drizzle with extra olive oil, and add a few chickpeas and parsley for garnish.
Pro Tips for Perfect Hummus
- Texture Matters: For extra creamy hummus, try removing the skins from the chickpeas. It takes a bit of effort but is worth it for the silky texture.
- Tahini Quality: Use high-quality tahini—this makes a significant difference in flavor. Look for brands that use roasted seeds.
- Balancing Flavors: Taste before serving! Adjust salt and lemon to your preference; every palate is different.
- Chill Time: Allow the hummus to chill for at least 30 minutes before serving to let the flavors meld.
- Experiment with Add-Ins: Try adding roasted red peppers, olives, or herbs to create unique flavor profiles.
- Use Fresh Garlic: For a milder garlic flavor, let minced garlic sit in lemon juice for a few minutes before adding it to the mix.
- Drizzle with Olive Oil: A touch of good olive oil on top not only adds flavor but also enhances visual appeal.
- Serving Temperature: Hummus can be served cold or at room temperature; find what you enjoy most!
Common Mistakes and Troubleshooting
Even the best of us can make a few missteps in the kitchen. Here’s how to avoid common pitfalls:
- Too Thick: If your hummus is too thick, add a bit more reserved chickpea liquid or water until you reach your desired consistency.
- Too Bitter: This can happen if the tahini is bitter. Ensure you’re using a high-quality brand, or balance with extra lemon juice.
- Flat Flavor: Not enough seasoning? Add more salt, lemon, or even a splash of vinegar to brighten it up.
- Grainy Texture: Over-processing can lead to a grainy texture. Keep an eye on it and process just until smooth.
Variations to Try
Once you’ve mastered the classic hummus, why not get creative? Here are some delicious variations:
- Roasted Garlic Hummus: Roast garlic cloves in olive oil until soft, then blend into your hummus for a sweeter flavor.
- Spicy Harissa Hummus: Add a tablespoon of harissa paste for a spicy kick that transports you straight to North Africa.
- Avocado Hummus: Blend in half an avocado for a creamy and nutritious twist—perfect for guacamole lovers!
- Beet Hummus: Roast beets and blend them in for a vibrant color and earthy flavor that’s sure to impress.
Storing and Make-Ahead Instructions
Hummus is perfect for meal prep! Here’s how to store it:
- Refrigeration: Store in an airtight container in the fridge for up to one week.
- Freezing: Hummus can be frozen for up to three months. Thaw in the fridge overnight before serving.
- Make-Ahead: You can prepare hummus a day in advance; just cover tightly and refrigerate until you’re ready to enjoy.
Frequently Asked Questions
- Can I use dried chickpeas instead of canned? Yes! Soak dried chickpeas overnight and cook them until soft for a fresher taste.
- What can I serve with hummus? Try pita bread, fresh veggies, crackers, or even on sandwiches and salads!
- Is hummus gluten-free? Yes, hummus is naturally gluten-free, making it a great option for those with dietary restrictions.
- How do I make hummus vegan? This recipe is already vegan! Just ensure your tahini is made from vegan-friendly ingredients.
- Can I add more garlic? Absolutely! If you love garlic, feel free to add more to taste.
- How do I know when my hummus is done? It should be creamy and smooth with no lumps. Taste and adjust seasonings as needed.
- Can I use other beans? While chickpeas are traditional, you can experiment with other beans like black beans or white beans!
- What’s the best way to serve hummus? Presentation is key! Drizzle with olive oil, sprinkle with spices, and garnish with herbs for a stunning look.
Nutrition Tips and Dietary Adaptations
This homemade hummus is already quite healthy, but here are some tips to make it even better:
- Low-Sodium Option: Use low-sodium chickpeas or rinse them well to reduce sodium content.
- Protein Boost: Add a scoop of Greek yogurt for extra protein and creaminess.
- Nut-Free: If you have nut allergies, ensure your tahini is made from sesame seeds without cross-contamination.
- Oil-Free: For a lower-fat version, reduce the amount of olive oil and add more chickpea liquid instead.
Equipment Recommendations
To achieve the best results, here’s what you’ll need:
- Food Processor: A high-quality food processor is essential for achieving that creamy texture.
- Measuring Cups and Spoons: Accurate measurements will ensure your flavors are balanced.
- Spatula: For scraping down the sides of the food processor to ensure everything is well mixed.
- Serving Bowl: A beautiful bowl for serving will elevate your dish and make it even more inviting.
Serving Suggestions
Now that your hummus is ready, here are some delicious serving ideas:
- Classic Pairing: Serve with warm pita bread and crunchy veggies like cucumber and carrots.
- Creative Boards: Create a mezze platter with olives, cheeses, and assorted dips for a delightful spread.
- As a Spread: Use hummus as a spread on sandwiches or wraps for added flavor and nutrition.
- In Salads: Drizzle on top of salads or grain bowls for a creamy dressing alternative.
Gather your loved ones, embrace the magic of cooking, and enjoy this delightful homemade hummus recipe. Whether it’s a casual gathering or a special occasion, let this dish spark joy and connection around your table!
Hummus
Ingredients
Canned Chickpeas
- 2 cans chickpeas, 1/4 cup of their liquid reserved, then drained and rinsed (skins removed, optional), a few reserved for garnish
- 1/4 cup reserved chickpea liquid
- 1/4 cup tahini
- 1 tablespoon lemon juice
- 2 teaspoons lemon juice
- 3/4 teaspoon sea salt
- 3 cloves garlic
- 1/3 cup olive oil (plus extra for drizzling)
- 1/4 teaspoon ground cumin
- 1/4 teaspoon paprika
Garnish
- as needed chopped parsley (for garnish)
- as needed chickpeas (for garnish)
- as needed olive oil (for drizzling)
- to serve Pita bread wedges or pita chips
Instructions
- Add chickpeas, reserved liquid, tahini, lemon juice, salt, and garlic to a food processor; blend until smooth.
- Slowly drizzle in olive oil while processing until creamy, about 4-5 minutes.
- Spoon into a serving dish and garnish with chickpeas, parsley, cumin, paprika, and a drizzle of olive oil.