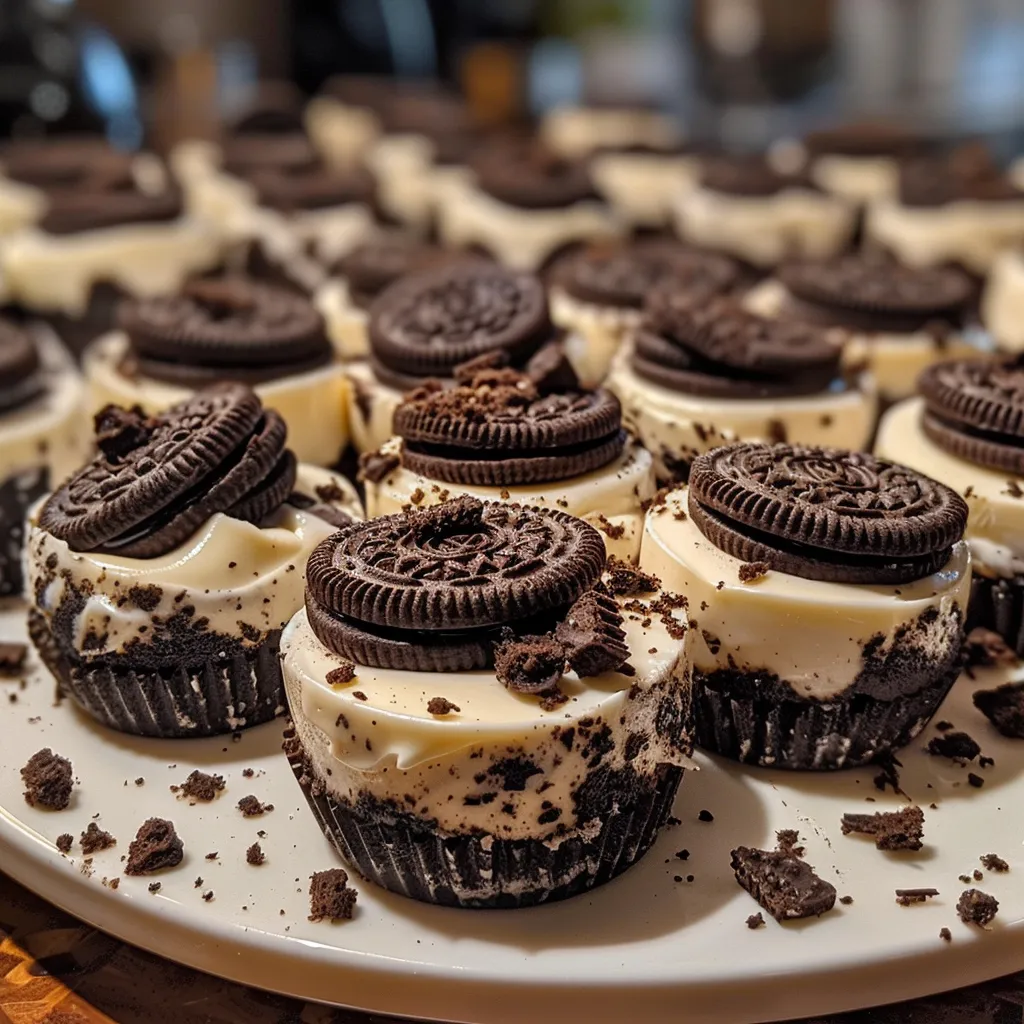
Indulge in the Sweetness of 5-Minute Oreo Cheesecake Bites
Welcome to a world where flavor meets simplicity! If you love decadent desserts but find yourself short on time, you’re in for a treat. These Oreo Cheesecake Bites are not just quick to whip up; they’re a celebration of creamy, chocolatey goodness that will delight your taste buds. In just five minutes of prep and a little chill time in the refrigerator, you can create these luscious treats that are perfect for any gathering or cozy night in. Let’s dive into the irresistible world of Oreo cheesecake!
Why You’ll Love This Recipe
- Quick and Easy: In just five minutes, and minimal effort, you can create a show-stopping dessert that impresses everyone.
- Decadent Flavor: The combination of rich cream cheese and crunchy Oreo cookies creates a delightful contrast that your taste buds will adore.
- Perfect Portions: These mini cheesecakes are individually sized, making them easy to serve without the mess of slicing.
- Make-Ahead Magic: Prepare these bites in advance and let them chill; they taste even better after resting in the refrigerator.
- Versatile Toppings: Customize your bites with toppings like chocolate shavings, sprinkles, or fresh berries for a personal touch.
Ingredients Breakdown
To create your own Oreo cheesecake bites, you’ll need the following ingredients:
- 14 Oreo cookies (crushed): The base of our cheesecake bites; feel free to experiment with other cookies like Graham crackers or chocolate wafer cookies for different flavors.
- 6 tablespoons unsalted butter (melted): This binds the crushed cookies together and adds richness to the crust.
- 16 ounces cream cheese (softened): The key ingredient for a creamy filling; make sure it’s at room temperature for easy mixing.
- 1/2 cup powdered sugar: Adds sweetness to the filling without affecting the texture.
- 1 teaspoon vanilla extract: Enhances the flavor profile, giving depth to the cheesecake.
- 1/2 cup heavy whipping cream: When whipped, this gives the filling a light, airy texture.
- Additional crushed Oreos (for topping): A delightful way to garnish your bites.
- Optional toppings: Consider chocolate shavings, sprinkles, or fresh berries for a festive finish.
Step-by-Step Instructions
Creating these delightful bites is as easy as 1-2-3! Follow these simple steps:
- In a mixing bowl, combine the crushed Oreos and melted butter until fully incorporated. Press the mixture firmly into the bottom of a 24-cup mini muffin tin using a spoon or small measuring cup. Chill in the refrigerator for 10 minutes to set.
- Beat the powdered sugar and softened cream cheese together with an electric mixer until smooth. Add in the vanilla extract and gradually mix in the heavy whipping cream until stiff peaks form.
- Fill each prepared crust to the brim with the cheesecake mixture using a spoon or pipette. Smooth the surface with a spatula or knife. Add more crushed Oreos on top, as well as sprinkles or chocolate curls for decoration.
- Place the muffin tin in the refrigerator and let the bites chill for at least one hour.
Pro Tips for Perfect Bites
With these expert insights, your cheesecake bites will be a hit!
- Room Temperature Cream Cheese: Always let your cream cheese soften at room temperature for a smoother filling.
- Whip It Good: Ensure your whipping cream is cold for best results; it will whip up to a fluffy texture.
- Customize Your Crust: Feel free to experiment with different cookie bases or even mix in some crushed nuts for added crunch.
- Chill for Flavor: Allowing the bites to chill longer enhances their flavor and makes them easier to handle.
- Presentation Matters: Use decorative muffin liners for a more festive look, perfect for parties.
- Flavor Infusion: Add a touch of almond extract or citrus zest to the filling for a unique twist.
- Don’t Overmix: When combining the cream, mix just until stiff peaks form to maintain that airy texture.
- Storage Tips: Keep any leftovers in an airtight container in the refrigerator for up to three days.
Common Mistakes and Troubleshooting
Even the best chefs encounter hiccups! Here are some common pitfalls and how to avoid them:
- Crust Too Crumbly: If your crust falls apart, add more melted butter to help it stick together.
- Filling Too Runny: Ensure your cream cheese is softened properly and avoid overmixing the cream.
- Over-Chilling: Don’t let them sit too long in the refrigerator after they’re set, or they may become too firm.
- Flavor Imbalance: If it’s too sweet, balance with a pinch of salt or a splash of lemon juice.
Delicious Variations to Try
Get creative with these variations to keep things exciting:
- Peanut Butter Lovers: Swirl in some peanut butter into the cheesecake filling for a nutty twist.
- Mint Chocolate: Use mint Oreos and add a few drops of mint extract for a refreshing flavor.
- Fruit Infusion: Top your cheesecake bites with fresh fruit like raspberries or strawberries for a pop of color and flavor.
- Chocolate Lovers: Mix in chocolate chips or use a chocolate cookie crust for extra richness.
Storage and Make-Ahead Instructions
These cheesecake bites are perfect for prep-ahead parties! Here’s how to store them:
- Store leftovers in an airtight container in the refrigerator for up to three days.
- For longer storage, consider freezing them. Place bites in a single layer on a baking sheet until frozen, then transfer to a freezer-safe container for up to a month.
- To defrost, simply let them sit in the refrigerator for a few hours before serving.
Frequently Asked Questions
Got questions? We’ve got answers!
- Can I make these bites dairy-free? Yes! Use dairy-free cream cheese and whipped cream substitutes.
- How long can I keep these bites? They last in the refrigerator for up to three days, or you can freeze them for up to a month.
- Can I use a different kind of cookie? Absolutely! Try using any sandwich cookie you love for a fun twist.
- Can these be made in advance? Yes! They taste even better after chilling overnight in the refrigerator.
- What’s the best way to serve them? Serve chilled, and consider garnishing with extra toppings for presentation.
- Can I double the recipe? Yes, just make sure to adjust your chilling time accordingly.
- Do I need to bake these? No baking required! These are no-bake cheesecake bites.
- What’s the best way to store leftovers? Keep them in an airtight container in the refrigerator for freshness.
Nutritional Tips and Dietary Adaptations
If you’re watching your diet, here are some tips to make these bites healthier:
- Low-Sugar Option: Use a sugar substitute in place of powdered sugar for a lighter treat.
- Gluten-Free: Opt for gluten-free cookies to make this recipe suitable for gluten-sensitive guests.
- Portion Control: Keep an eye on portion sizes; these mini bites are rich, and a little goes a long way!
Equipment Recommendations
Having the right tools makes all the difference! Here’s what you’ll need:
- 24-Cup Mini Muffin Tin: Essential for shaping your cheesecake bites.
- Electric Mixer: For whipping the cream and mixing the filling smoothly.
- Spatula: A must for smoothing out the tops of your cheesecake mixture.
- Airtight Container: For storing your delicious leftovers in the refrigerator.
Serving Suggestions
Now that you’ve created these scrumptious bites, here are some serving ideas:
- Pair with a cup of coffee or espresso for a delightful afternoon treat.
- Set them out at parties as a sweet finger food that everyone will love.
- Consider serving on a platter with a variety of toppings for guests to customize their bites.
- Garnish with a sprig of mint for an elegant touch!
Conclusion
Creating your own Oreo Cheesecake Bites is not just about making dessert; it’s about inviting joy and sweetness into your life. With just a few simple ingredients and minimal effort, you can craft a treat that brings smiles to the table. So gather your friends and family, and start celebrating with these delightful bites today. Don’t forget to explore variations and have fun with your toppings — after all, cooking is all about creativity and love!
5-Minute Oreo Cheesecake Bites
Ingredients
Crust
- 14 pieces Oreo cookies (crushed)
- 6 tablespoons unsalted butter (melted)
Filling
- 16 ounces cream cheese (softened)
- 1/2 cup powdered sugar
- 1 teaspoon vanilla extract
- 1/2 cup heavy whipping cream
Toppings
- Additional crushed Oreos (for topping)
- Optional Chocolate shavings, Sprinkles, Fresh berries (for decoration)
Instructions
- Combine crushed Oreos and melted butter; press into mini muffin tin. Chill for 10 minutes.
- Beat powdered sugar and cream cheese until smooth; add vanilla and whip in heavy cream until stiff peaks form.
- Fill crusts with cheesecake mixture; top with crushed Oreos and decorations. Chill for at least 1 hour.