

Discover the Joy of Japanese Strawberry Shortcake
Welcome to the delightful world of Japanese Strawberry Shortcake, a dessert that transforms any occasion into a celebration! This light and airy sponge cake is layered with fresh strawberries and whipped cream, creating a symphony of flavor and texture that dances on your palate. Whether it’s a birthday, a holiday gathering, or just a sweet treat for yourself, this cake is sure to impress. Join me, Rafael, as we embark on this flavorful journey, rooted in tradition yet bursting with modern flair!
In this comprehensive guide, you’re going to learn everything you need to know about making this exquisite cake, from selecting the best ingredients to mastering the techniques that will elevate your baking game. So grab a whisk, and let’s dive into the delightful process of creating your very own Japanese Strawberry Shortcake!
Why You’ll Love This Recipe
This recipe is not just about making a cake; it’s about creating memories and sharing joy. Here are five reasons why you’ll adore making this Japanese Strawberry Shortcake:
- Irresistible Flavor: The combination of sweet strawberries and creamy whipped cream perfectly balances the lightness of the sponge, making each bite a heavenly experience.
- Elegant Presentation: With its stunning layers and vibrant colors, this cake is a showstopper that will steal the spotlight at any gathering.
- Customizable Layers: You can easily adapt the fillings and toppings to suit your taste or seasonal fruits, perfect for every occasion.
- Simple Ingredients: Made with basic pantry staples, this cake doesn’t require fancy ingredients or equipment, making it accessible to all home bakers.
- Memorable Tradition: Share a slice of this cake with your family and friends, and you’ll create lasting memories while celebrating Japanese culture.
Ingredients Breakdown and Substitutions
Let’s take a closer look at the ingredients that make up this delightful cake. Understanding each component will help you appreciate the flavors and textures you’re about to create.
- All-Purpose Flour (125g / 4.4oz): Sifted three times for a light texture. You can substitute with cake flour for an even fluffier sponge.
- Sugar (100g / 3.5oz): Granulated sugar enhances sweetness while contributing to the cake’s moisture. You may use coconut sugar for a healthier option.
- Large Eggs (4): Separated into yolks and whites. If you’re vegan, consider using aquafaba (chickpea water) as a substitute.
- Melted Butter (60g / 2.1oz): Adds richness and moisture. Coconut oil is a great dairy-free alternative.
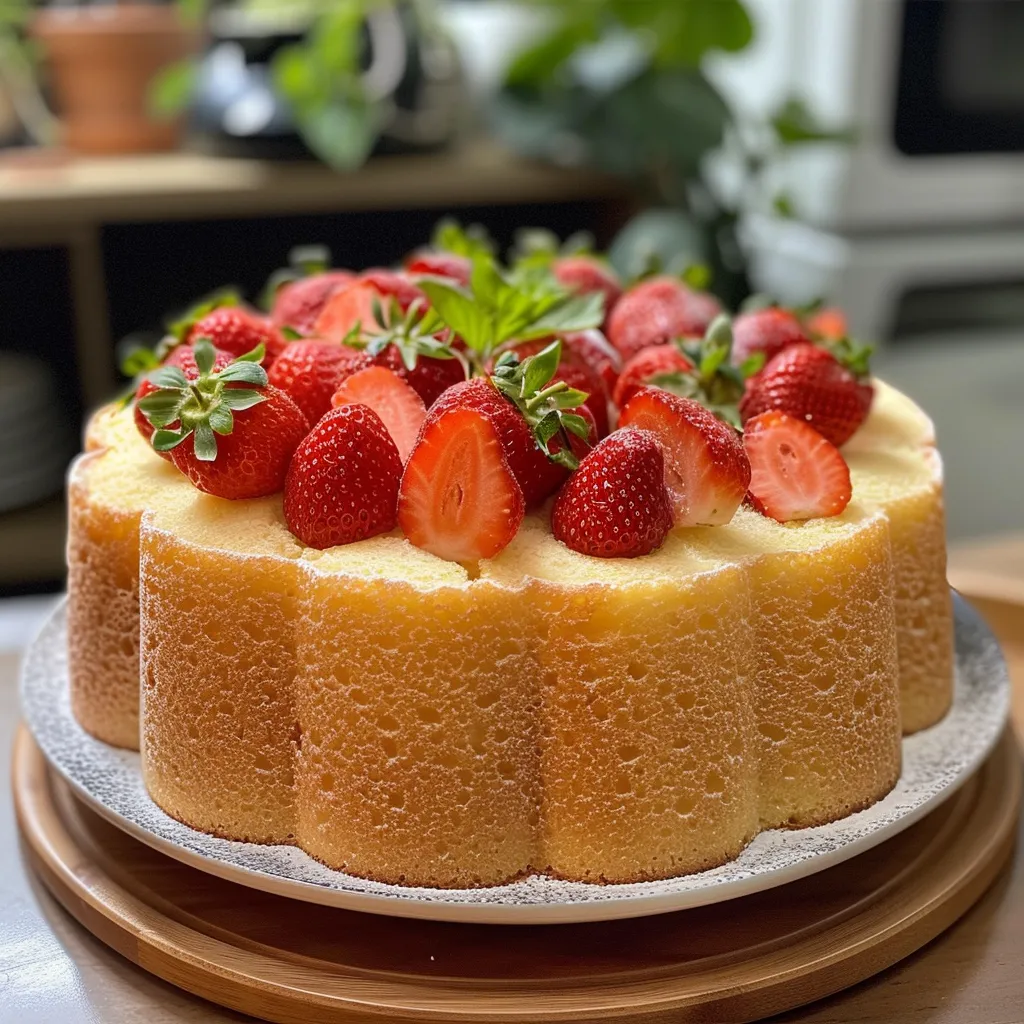
- Strawberries (18 mid-size): Fresh, ripe strawberries are key. Feel free to mix in other berries like raspberries or blueberries for a twist.
- Whipping Cream (400ml): For a luscious frosting. You can use a plant-based cream for a dairy-free version.
Steps to Make the Perfect Japanese Strawberry Shortcake
Now that we have everything ready, let’s dive into the step-by-step process to create this beautiful cake!
Step 1: Prepare the Sponge Cake
1. Preheat your oven to 170°C (340°F). Prepare a round cake tin by buttering and dusting it with flour.
2. In a bowl, whisk together the egg yolks and sugar until the mixture is pale and creamy. Add the melted butter and mix well.
3. Gently fold in the sifted flour until just combined. Be careful not to overmix!
4. In a separate bowl, whip the egg whites until soft peaks form. Gradually add in sugar and continue whipping until stiff peaks form.
5. Gently fold the egg whites into the batter in three additions, ensuring you don’t deflate the mixture.
6. Pour the batter into the prepared cake tin and bake for 25-30 minutes or until a toothpick comes out clean. Let it cool completely.
Step 2: Whip the Cream
1. In a chilled bowl, whip the cream with sugar until soft peaks form. You want it to be thick but still spreadable.
2. Once your sponge is completely cool, slice it into three equal layers.
Step 3: Assemble the Cake
1. Place one layer of sponge on a serving plate. Spread a generous layer of whipped cream and top with sliced strawberries.
2. Place the second sponge layer on top and repeat the process. Finish with the last layer of sponge.
3. Cover the entire cake with a thin layer of whipped cream and decorate with remaining strawberries on top.
Step 4: Chill and Serve
1. Refrigerate the cake for at least one hour before serving. This allows the flavors to meld beautifully.
2. Slice and enjoy your masterpiece!
Expert Pro Tips for Success
To help you achieve the best results, here are some expert insights and tips:
- Room Temperature Eggs: Make sure your eggs are at room temperature for better aeration during whipping.
- Proper Folding Technique: Use a gentle folding motion when combining the egg whites with the batter; this keeps the mixture light and airy.
- Chill Your Tools: Chill your mixing bowl and beaters for whipping cream; it helps achieve the perfect consistency.
- Layering with Care: Ensure the sponge layers are completely cooled before assembly to prevent the cream from melting.
- Decorate with Fresh Fruits: Besides strawberries, consider adding seasonal fruits for vibrant colors and flavors.
- Experiment with Flavors: Add a splash of vanilla extract or lemon zest to the whipped cream for an extra flavor boost.
- Use a Cake Board: If you’re planning to transport your cake, assemble it on a cake board for easier handling.
- Keep It Covered: Store any leftovers covered in the refrigerator to maintain freshness.
Common Mistakes and Troubleshooting
Even the best bakers can face challenges. Here are some common mistakes to avoid:
- Overmixing the Batter: This can lead to a dense sponge. Mix just until combined.
- Not Prepping the Tin: Ensure your cake tin is well-greased and floured to avoid sticking.
- Skipping the Chilling Step: Don’t skip chilling the cake after assembly; it enhances flavor and makes slicing easier.
- Using Cold Cream: Cold cream won’t whip well. Make sure it’s slightly chilled but not too cold.
Delicious Variations to Try
Feeling adventurous? Here are some delightful variations you can try:
- Matcha Twist: Incorporate matcha powder into the sponge for a unique flavor and color.
- Chocolate Delight: Add cocoa powder to the batter for a chocolate-infused sponge cake.
- Berry Medley: Mix in other berries like blueberries or blackberries for a fruity burst.
- Lemon Zest: Add lemon zest to the whipped cream for a refreshing citrus twist.
Storage and Make-Ahead Instructions
This cake is best enjoyed fresh, but you can store leftovers in the refrigerator for up to three days. To make ahead:
- Assemble the sponge and whipped cream separately, storing the sponge layers in an airtight container.
- Whip the cream just before serving for the best texture.
Your Questions Answered: Comprehensive FAQ
Got questions? Here are some common ones answered:
- What is the best way to serve Japanese Strawberry Shortcake? Serve chilled, garnished with fresh strawberries and a dusting of powdered sugar.
- Can I use frozen strawberries? Yes, but fresh strawberries yield the best flavor and texture.
- How do I know when the sponge cake is done? It should be golden brown, and a toothpick inserted in the center should come out clean.
- Can I make this cake gluten-free? Yes, use a gluten-free flour blend as a substitute.
- How long can I store the cake? It’s best consumed within three days when stored in the refrigerator.
- Can I freeze the sponge cake? Yes, you can freeze the baked sponge layers wrapped tightly in plastic wrap for up to a month.
- What’s the difference between this and Western strawberry shortcake? Japanese Strawberry Shortcake is lighter and less sweet, focusing on the freshness of the strawberries and cream.
- How can I make the cake more decadent? Add layers of chocolate ganache or a layer of custard between the sponge and whipped cream.
Nutritional Tips and Dietary Adaptations
This cake can be made with various dietary needs in mind:
- Dairy-Free: Use coconut cream instead of whipping cream and plant-based butter.
- Low-Sugar: Substitute sugar with a low-calorie sweetener like stevia or erythritol.
- Gluten-Free: Replace all-purpose flour with a gluten-free blend.
- Vegan: Use aquafaba for eggs, plant-based butter, and non-dairy cream.
Essential Equipment Recommendations
Here’s what you’ll need to create this masterpiece:
- Mixing Bowls: A set of mixing bowls in various sizes for easy ingredient preparation.
- Electric Mixer: A hand or stand mixer will make whipping eggs and cream a breeze.
- Cake Tins: Round cake tins are essential for baking your sponge.
- Whisk: A good whisk is key for mixing and aerating your ingredients.
- Spatula: A silicone spatula is perfect for folding the batter without deflating it.
Serving Suggestions
This cake is perfect on its own, but here are some serving ideas to enhance the experience:
- Pair with Tea: Enjoy a slice with a cup of green tea or jasmine tea for a delightful afternoon treat.
- Top with Extra Berries: Serve with additional fresh berries on the side for a pop of color and flavor.
- Include a Sauce: Drizzle with a berry coulis or chocolate sauce for an indulgent touch.
- Garnish: Fresh mint leaves make a beautiful garnish and add a pop of color.
Conclusion
And there you have it! Your guide to crafting the perfect Japanese Strawberry Shortcake that’s bound to become a cherished recipe in your kitchen. Not only is it a celebration of taste and texture, but it also invites you to share joy with loved ones. Remember, cooking is about exploration and enjoyment, so don’t hesitate to add your personal touch! Now, gather your ingredients, unleash your creativity, and let this delightful cake bring warmth and happiness to your table. Happy baking!
Japanese Strawberry Sponge Cake Strawberry Shortcake
Ingredients
Dry ingredients
- 125 g all-purpose flour (sifted 3 times)
- 100 g sugar (note 1)
Eggs
- 4 large eggs (yolks and whites separated note 2)
Butter
- 60 g butter (melted)
Coating
- butter and flour to coat inside the cake pan
Strawberries
- 18 mid-size strawberries (note 3)
Whipping cream
- 400 ml cream for whipping (note 4)
Sugar for cream
- 10 g sugar (2½ tsp)
Water
- 40 ml water
Additional sugar
- 10 g sugar (2½ tsp)
Instructions
- Preheat oven to 170°C (340°F). Grease and flour the cake pan.
- Beat egg yolks with sugar until thick, then fold in melted butter and sifted flour.
- In a separate bowl, beat egg whites until stiff peaks form, then gently fold into batter.
- Pour batter into prepared pan and bake for 20 minutes. Let cool.
- Whip cream with sugar until soft peaks form. Slice strawberries.
- Assemble cake layers, spread whipped cream, and top with strawberries. Chill before serving.