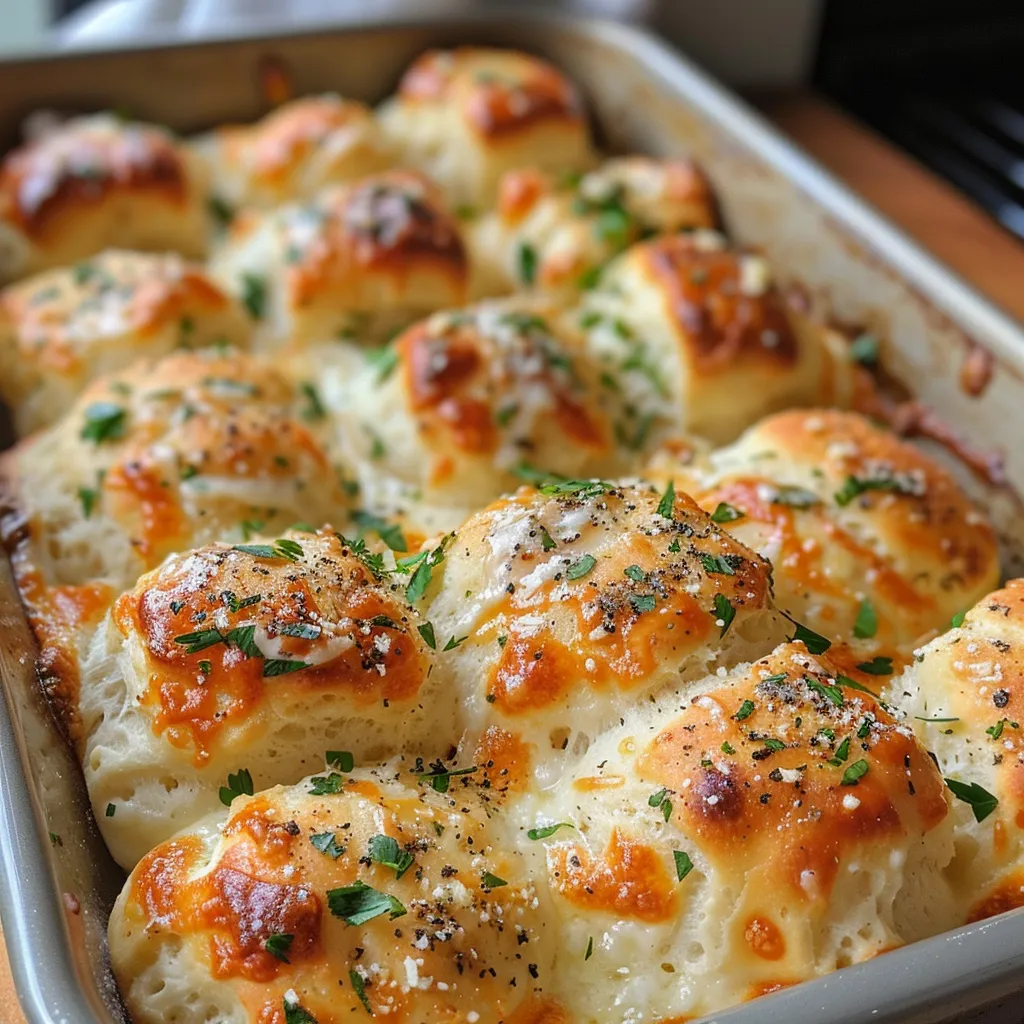
Welcome to the delightful world of Cheesy Garlic Bombs, where every bite is a celebration of gooey cheese, aromatic garlic, and the spirit of Mediterranean cooking! These irresistible treats are not just snacks; they are a joyous experience that brings family and friends together. Whether you’re hosting a game night, a holiday gathering, or simply craving something comforting, these cheesy delights are sure to steal the show. Let’s dive into the magic of cheesy garlic bombs and discover why they are the perfect addition to any meal!
Why You’ll Love This Recipe
- Quick and Easy Preparation: With just a handful of ingredients and simple steps, you can whip up these cheesy garlic bombs in no time, making them perfect for unexpected guests.
- Gooey Goodness: The combination of melted mozzarella and garlic butter creates a mouthwatering treat that’s hard to resist.
- Customizable Flavors: Feel free to experiment with different cheeses and fillings, allowing you to tailor each batch to your taste preferences.
- Perfect for Any Occasion: Whether it’s a cozy family dinner or a lively gathering, these bombs are a hit at parties, game nights, and holidays.
- Make Ahead and Store: They can be prepared in advance and frozen, allowing for quick meals any time you want a snack.
Ingredients Breakdown
To create the ultimate cheesy garlic bombs, you’ll need the following ingredients:
- 1 can refrigerated biscuit dough (8-count, cut into halves): This serves as the base for our cheesy delights. You can also use pizza dough or puff pastry for a different texture.
- 12 small mozzarella cubes: The heart of these bombs, mozzarella provides the gooey, stretchy cheese effect. You can substitute with cheddar for a sharper flavor.
- 3 tablespoons butter (melted): This is essential for the garlic butter topping that elevates the flavor. Consider using garlic-infused olive oil for an extra punch.
- 2 cloves garlic (minced): Fresh garlic is key for that aromatic flavor. If you’re short on time, garlic powder can be a quick alternative.
- 1 teaspoon Italian seasoning: This blend of herbs adds depth to the flavor. You can mix your favorite dried herbs if you prefer.
- 1/2 teaspoon salt: Enhances the overall taste of the bombs.
- 1/2 teaspoon black pepper: A pinch of heat balances the rich flavors.
- 1 tablespoon fresh parsley (chopped): Adds a fresh, vibrant touch to the dish. Feel free to substitute with basil or oregano.
- 1/4 cup grated Parmesan cheese: For a nutty finish and an added layer of flavor.
Step-by-Step Instructions to Make Cheesy Garlic Bombs
Ready to create these cheesy wonders? Follow these simple steps:
- Preheat the oven to 375°F (190°C) and prepare a baking sheet lined with parchment paper.
- Mix the garlic butter: In a small bowl, combine melted butter, minced garlic, Italian seasoning, salt, pepper, and chopped parsley.
- Prepare the dough: Take the biscuit dough and cut each piece in half. Flatten each piece slightly to create a base for the filling.
- Fill with cheese: Place one mozzarella cube in the center of each dough piece. If you want to get creative, add other fillings like cooked bacon bits or jalapeños.
- Seal the bombs: Fold the dough over the filling and pinch to seal tightly, ensuring the cheese doesn’t escape during baking.
- Brush with garlic butter: Place the sealed bombs on the baking sheet and generously brush the tops with the garlic butter mixture.
- Bake to perfection: Bake for 12-15 minutes, or until golden brown and puffed up.
- Cool and serve: Let them cool for a few minutes before digging in. Serve warm and enjoy the ooey-gooey goodness!
Pro Tips for Success
- Seal Well: Ensure the dough is sealed tightly to prevent any cheese leakage during baking.
- Experiment with Fillings: Don’t hesitate to try different cheeses or add-ins like pepperoni, spinach, or creamy ricotta.
- Adjust Baking Time: Ovens vary, so keep an eye on your bombs. They should be golden brown and puffed.
- Use Fresh Ingredients: Fresh garlic and herbs make a noticeable difference in flavor.
- Let Them Rest: Allow the bombs to cool slightly before serving to let the cheese set and avoid burns.
- Serve with Dipping Sauces: Pair with marinara sauce, ranch, or a spicy aioli for an added kick.
- Try Different Dough: Feel free to experiment with different types of dough for varying textures and flavors.
- Make a Double Batch: These cheesy garlic bombs are so good, you’ll want extras for later!
Common Mistakes and Troubleshooting
- Underbaking: If the bombs aren’t golden brown, they may need extra time in the oven. Keep checking!
- Overstuffing: Too much filling can cause the dough to burst open. Stick to one cheese cube for best results.
- Not Sealing Properly: If you notice cheese leaking out, double-check that each bomb is completely sealed.
- Skipping the Brush: Skipping the garlic butter brush can lead to dry bombs; don’t omit this step!
Variations to Try
- Buffalo Chicken Bombs: Add shredded cooked chicken tossed in buffalo sauce for a spicy kick.
- Spinach and Feta Bombs: Substitute mozzarella with feta and add fresh spinach for a Mediterranean twist.
- Sweet Garlic Bombs: Use Nutella or chocolate as a filling with a sprinkle of cinnamon sugar for dessert-style bombs.
- Cheesy Herb Bombs: Mix in a variety of cheeses like gouda or pepper jack, along with fresh herbs.
Storage and Make-Ahead Instructions
These cheesy garlic bombs can be prepared ahead of time and stored in several ways:
- Refrigerate: Assemble the bombs, place them on a baking sheet, and cover with plastic wrap. Store in the fridge for up to 24 hours before baking.
- Freeze: Freeze unbaked bombs on a baking sheet, then transfer to a zip-top bag once frozen. They can be stored for up to 3 months. Bake from frozen, adding a few extra minutes to the baking time.
Frequently Asked Questions (FAQ)
- Can I use other types of cheese? Yes! Feel free to experiment with different cheeses like cheddar, gouda, or pepper jack.
- What if I don’t have biscuit dough? Pizza dough or puff pastry works great as alternatives!
- Can I make these vegan? Substitute the butter with vegan margarine and use dairy-free cheese.
- How do I know when they are done baking? They should be golden brown and puffed up. A toothpick inserted should come out clean.
- Can I prepare these ahead of time? Absolutely! Follow the make-ahead instructions for easy prep.
- What should I serve with cheesy garlic bombs? They are delicious on their own, but dipping sauces like marinara, ranch, or garlic aioli enhance the experience.
- How can I store leftovers? Store in an airtight container in the fridge for up to 3 days. Reheat in the oven for best results.
- Can I use frozen dough? Yes, just ensure it is fully thawed before using.
Nutritional Tips and Dietary Adaptations
For a healthier spin, consider the following adjustments:
- Whole Wheat Dough: Use whole wheat biscuit dough for added fiber.
- Low-Fat Cheese: Opt for low-fat cheese varieties to reduce calories.
- Vegetable Fillings: Bulk up your bombs with veggies like bell peppers, mushrooms, or zucchini for extra nutrients.
Equipment Recommendations
Here’s what you’ll need to make these cheesy garlic bombs:
- Baking Sheet: A sturdy baking sheet lined with parchment paper ensures even baking.
- Mixing Bowls: For mixing your garlic butter and preparing the dough.
- Pastry Brush: For brushing on the garlic butter mixture.
- Measuring Cups and Spoons: For accurate ingredient measurements.
Serving Suggestions
These cheesy garlic bombs can be enjoyed in various ways:
- As an Appetizer: Serve them hot with dipping sauces for a delightful start to any meal.
- Party Snack: Perfect for game nights or gatherings, they are sure to impress your guests.
- Side Dish: Pair with soups or salads for a comforting meal.
Conclusion
In the world of comfort food, Cheesy Garlic Bombs shine bright! They are simple to make, packed with flavor, and customizable to suit your cravings. Whether you’re enjoying a quiet evening or hosting a lively gathering, these delightful bombs are sure to bring smiles and satisfaction. So, roll up your sleeves, gather your ingredients, and let’s create some magic in the kitchen. Happy cooking!
Cheesy Garlic Bombs – Gooey, Buttery & Irresistible
Ingredients
Dough
- 1 can refrigerated biscuit dough (8-count, cut into halves)
- 12 small mozzarella cubes
- 3 tablespoons butter (melted)
- 2 cloves garlic (minced)
- 1 teaspoon Italian seasoning
- 0.5 teaspoon salt
- 0.5 teaspoon black pepper
- 1 tablespoon fresh parsley (chopped)
- 0.25 cup grated Parmesan cheese
Instructions
- Preheat oven to 375°F (190°C).
- Divide biscuit dough into halves and flatten each piece.
- Place a mozzarella cube in the center of each dough piece, then fold and seal.
- Mix melted butter, garlic, Italian seasoning, salt, pepper, and parsley; brush over the dough bombs.
- Bake for 15 minutes until golden and bubbly. Sprinkle Parmesan on top before serving.