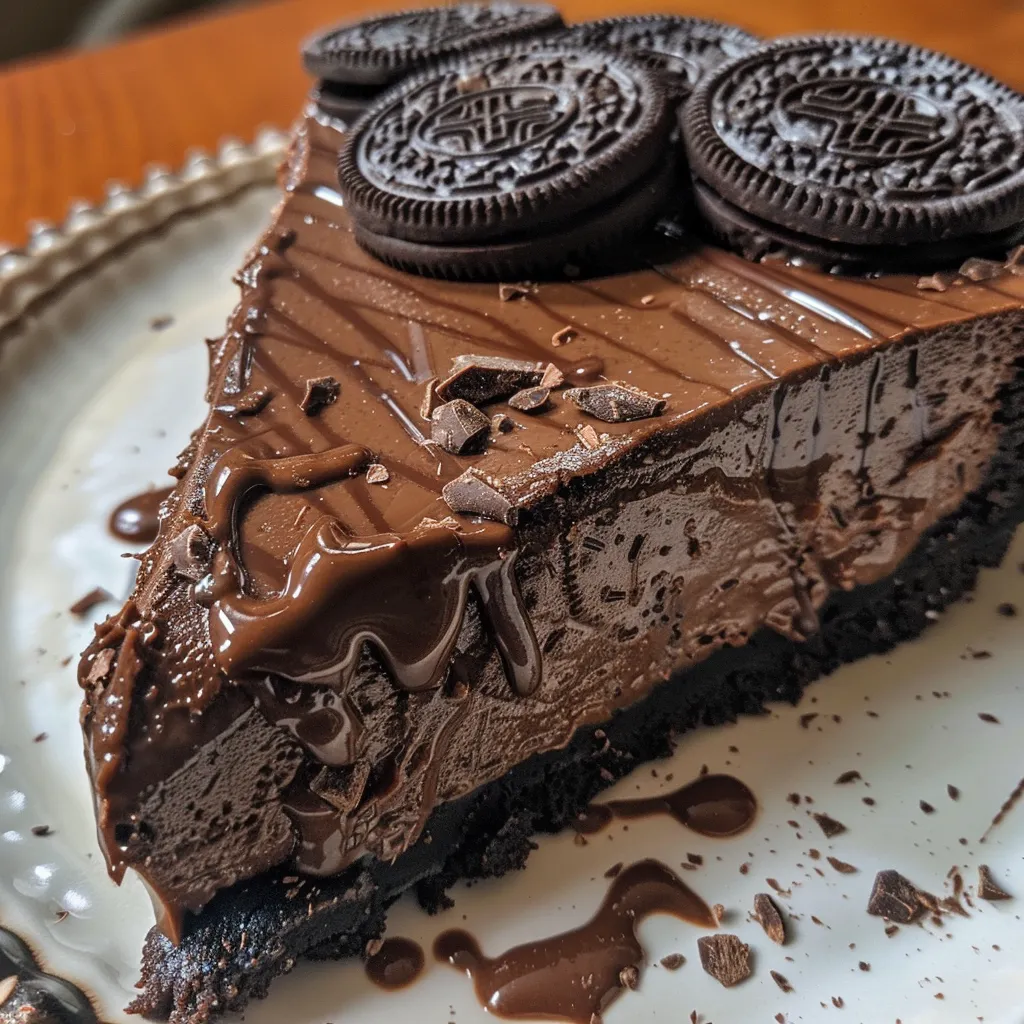
Experience the Joy of Cooking: A No-Bake Chocolate Tart
Welcome to a delightful journey into the world of desserts! Today, we’re diving into the creation of a luscious No-Bake Chocolate Tart that’s not only rich and creamy but also incredibly easy to prepare. This dessert is perfect for any occasion, whether it’s a festive gathering, a cozy date night, or simply a sweet treat for yourself. With every slice, you’ll experience the magic of chocolate and the satisfaction of homemade goodness. Let’s embark on this culinary adventure together, shall we?
Why You’ll Love This Recipe
- Effortless Preparation: You can whip up this no-bake chocolate tart without turning on the oven, making it a hassle-free dessert option.
- Rich Flavor Profile: The combination of bittersweet and milk chocolate creates a decadent filling that melts in your mouth.
- Versatile Dessert: Dress it up for special occasions or keep it simple for casual nights, this tart adapts to any setting.
- Make-Ahead Convenience: Prepare it a day in advance and let it chill in the fridge, allowing the flavors to deepen.
- Family-Friendly Delight: Kids and adults alike will adore the sweet, creamy filling and crunchy crust.
Ingredients Breakdown
To create this scrumptious tart, let’s go over the ingredients in detail. Each ingredient plays a vital role in the texture and flavor, ensuring you get the perfect dessert every time.
- 24 Oreo cookies (270g): These form the foundation of our crust. The combination of chocolate cookie and cream filling provides a rich flavor that complements the ganache beautifully.
- 6 tablespoons (85g) unsalted butter, melted: This acts as the binder for your crust, ensuring it holds together perfectly when pressed into the tart pan.
- 1 cup (170g, 6 oz.) coarsely chopped bittersweet chocolate: The star of the filling, bittersweet chocolate gives depth and richness to the ganache.
- 1 cup (170g, 6 oz.) coarsely chopped milk chocolate: Adding milk chocolate balances the bitterness of the bittersweet chocolate for a harmonious flavor.
- 1 cup (240 ml) heavy cream: Essential for creating a silky ganache that sets perfectly and has a smooth texture.
- 1/4 cup (56g) unsalted butter, cut into small pieces: This enhances the creaminess of the ganache and adds a touch of silky richness.
Pro Tips for the Perfect Tart
Follow these expert insights to elevate your tart-making game!
- Chill Before Serving: Refrigerate your tart for at least 4 hours, or overnight if possible, to ensure the ganache sets properly.
- Use Quality Chocolate: Opt for high-quality chocolate bars instead of chips for a smoother, richer ganache.
- Don’t Rush the Crust: Let the crust firm up in the fridge before adding the filling to prevent a soggy bottom.
- Experiment with Flavors: Consider adding a splash of vanilla extract or a sprinkle of sea salt to the ganache for an extra flavor boost.
- Use Different Cookies for the Crust: Instead of Oreos, try using chocolate wafers or graham crackers for a unique twist.
- Presentation Matters: Top your tart with fresh fruits, whipped cream, or chocolate shavings for a beautiful finish.
- Serving Temperature: Allow the tart to sit at room temperature for about 10-15 minutes before slicing for cleaner cuts.
- Store Properly: Keep the tart covered in the fridge to maintain freshness and prevent it from absorbing other flavors.
Common Mistakes and Troubleshooting
Even seasoned bakers can encounter mishaps. Here are some common pitfalls and how to avoid them:
- Soggy Crust: Ensure the crust is pressed firmly into the pan and properly chilled before adding the filling.
- Ganache Not Setting: If your ganache doesn’t set, check that you used enough heavy cream and allow it ample chilling time.
- Chocolate Seizing: When melting chocolate, avoid overheating it. Use a double boiler or microwave in short bursts, stirring frequently.
- Cracked Ganache: If your ganache cracks, it might be too cold or set too quickly. Let it warm slightly before serving.
- Too Sweet: If the tart is too sweet for your taste, balance it with a pinch of salt or add more dark chocolate next time.
Variations to Try
This no-bake chocolate tart is versatile! Here are some exciting variations to consider:
- Mint Chocolate Tart: Add a few drops of peppermint extract to the ganache for a refreshing minty twist.
- Nutty Tart: Incorporate finely chopped nuts, such as hazelnuts or almonds, into the crust for added crunch and flavor.
- Fruit-Infused Ganache: Blend in some raspberry puree or other fruit purees for a fruity flavor enhancement.
- Spicy Chocolate Tart: Infuse your cream with a pinch of cayenne pepper or chili powder for a surprising kick!
Storage and Make-Ahead Instructions
This tart is perfect for preparing in advance!
- Make-Ahead: You can easily make this tart one day in advance. Simply prepare, chill, and cover until serving.
- Storing Leftovers: Keep leftovers covered in the fridge for up to 4-5 days. Enjoy cold or let it sit at room temperature before serving for the best texture.
Comprehensive FAQ
Here’s everything you need to know about making your no-bake chocolate tart:
- Can I use dark chocolate instead of bittersweet? Absolutely! Just be mindful of the sweetness level, as dark chocolate is less sweet.
- What if I don’t have heavy cream? You can substitute with coconut cream for a dairy-free version, but the texture may differ slightly.
- How do I know when the ganache is set? The ganache should be firm to the touch but still slightly soft; it should not jiggle when the tart is moved.
- Can I freeze this tart? Yes, you can freeze the tart for up to a month. Just ensure it’s well-wrapped to prevent freezer burn.
- What can I serve with the tart? Consider pairing with whipped cream, fresh berries, or a scoop of vanilla ice cream for a delightful contrast.
- Is it possible to make a gluten-free version? Yes! Use gluten-free cookies for the crust, and ensure all other ingredients are gluten-free.
- How can I enhance the presentation? Top with chocolate shavings, edible flowers, or fresh fruit to make your tart visually stunning.
- Can I use a different pan size? Yes, but keep in mind that the cooking time may vary. A smaller pan will yield a thicker tart, while a larger pan will create a thinner one.
Nutritional Tips and Dietary Adaptations
Want to make this tart a bit healthier? Here are some tips:
- Reduce Sugar: Opt for dark chocolate with a higher cocoa content to reduce overall sweetness.
- Swap Ingredients: Use Greek yogurt instead of butter for a lighter filling or a nut butter for added protein.
- Portion Control: Serve smaller slices to enjoy the rich flavors without overindulging.
Recommended Equipment
To make your tart-making experience smooth and enjoyable, consider these essential tools:
- 9-inch tart pan: Ideal for ensuring even baking and a beautiful presentation.
- Food processor: Perfect for crushing cookies into fine crumbs.
- Rubber spatula: Great for mixing and scraping down the sides of bowls.
- Double boiler or microwave-safe bowl: Essential for melting chocolate without burning it.
Serving Suggestions
As you prepare to serve your stunning tart, consider these delightful suggestions:
- Garnish with Fresh Berries: Strawberries, raspberries, or blueberries add a burst of freshness and color.
- Whipped Cream: A dollop of freshly whipped cream enhances the richness and adds a light touch.
- Chocolate Drizzle: A drizzle of melted chocolate on top creates an elegant finish.
- Mint Leaves: A sprig of fresh mint adds a pop of color and a hint of freshness.
As we conclude this culinary journey, I hope you feel inspired to create your own no-bake chocolate tart. Remember, cooking is not just about feeding yourself; it’s about creating moments, memories, and connections. So grab a plate, invite your friends or family, and let’s celebrate life together with this decadent dessert. Enjoy your creation and the joy it brings to your table!
No-Bake Chocolate Tart
Ingredients
Crust
- 24 cookies Oreo cookies
- 6 tablespoons unsalted butter, melted
Filling
- 1 cup coarsely chopped bittersweet chocolate
- 1 cup coarsely chopped milk chocolate
- 1 cup heavy cream
- 1/4 cup unsalted butter, cut into small pieces
Instructions
- Pulse Oreo cookies in a food processor until finely ground, then mix with melted butter and press into a 9-inch tart pan. Chill for 30 minutes or bake at 350F/180C for 5-6 minutes, then cool.
- Place chopped chocolates in a bowl. Heat heavy cream and butter until boiling, pour over chocolate, and stir until smooth. Pour into crust and refrigerate for at least 4 hours.
- Keep the tart covered in the fridge for up to 4-5 days.