

Indulge in a Sweet Escape: The Allure of No-Bake Biscoff Cheesecake Cups
Welcome to a delightful journey into the world of desserts with a Mediterranean twist! Today, we’re diving into the luscious realm of No-Bake Biscoff Cheesecake Cups. This dessert is not just a treat; it’s an experience that encapsulates the essence of creamy cheesecake, tantalizing Biscoff flavors, and the simplicity of no-bake preparation. Perfect for gatherings or a cozy night in, these cups promise to bring joy and satisfaction with every bite.
Imagine the scene: the sun is setting, casting a golden glow in your kitchen, and the enticing aroma of Biscoff biscuits fills the air. As you prepare these cheesecake cups, you’re not just cooking; you’re creating memories and sharing love through food. Let’s explore why this recipe is a must-try!
Why You’ll Love This Recipe
- Effortless Preparation: With no baking required, these cheesecake cups are incredibly easy to whip up, making them perfect for last-minute gatherings or a sweet craving.
- Irresistible Flavors: The combination of creamy cheesecake and the unique spiced notes of Biscoff biscuits creates a flavor profile that is both comforting and exciting.
- Individual Servings: Serving them in cups means everyone gets their own delightful portion, making them visually appealing and perfect for sharing.
- Customizable Toppings: You can easily personalize these cups with your favorite toppings, adding a fun twist to each serving.
- Make-Ahead Convenience: These no-bake cheesecake cups can be made ahead of time, allowing you more time to enjoy the company of your guests.
Ingredient Breakdown
Let’s get into the details of what makes these Biscoff cheesecake cups so special. Below, you’ll find the ingredients needed along with some helpful substitutions for your convenience.
- 30 pieces Lotus Biscoff biscuits: These form the crunchy, spiced base and add that signature flavor. You can substitute with any other spiced biscuit if necessary.
- 2 tablespoons unsalted butter (melted): This helps to bind the biscuit crumbs firmly. For a dairy-free option, use coconut oil.
- 16 oz heavy cream (2 cups): Whipped to fluffy peaks for a light and airy cheesecake texture. You can use coconut cream for a non-dairy alternative.
- 8 oz cream cheese (at room temperature): Essential for that creamy consistency. If you need a vegan option, consider using a plant-based cream cheese.
- 1/2 cup powdered sugar: Adds sweetness to the cheesecake filling. You can adjust this based on your preference or use a sugar substitute.
- 1 cup Biscoff spread: The star of this recipe! It adds richness and flavor. Feel free to use other cookie spreads if desired.
- 1 teaspoon vanilla extract: Enhances the overall flavor of the cheesecake. You can also use almond extract for a twist.
- 1/2 cup Biscoff spread (for drizzling on top): For that extra indulgence. Make sure to warm it slightly for easy drizzling.
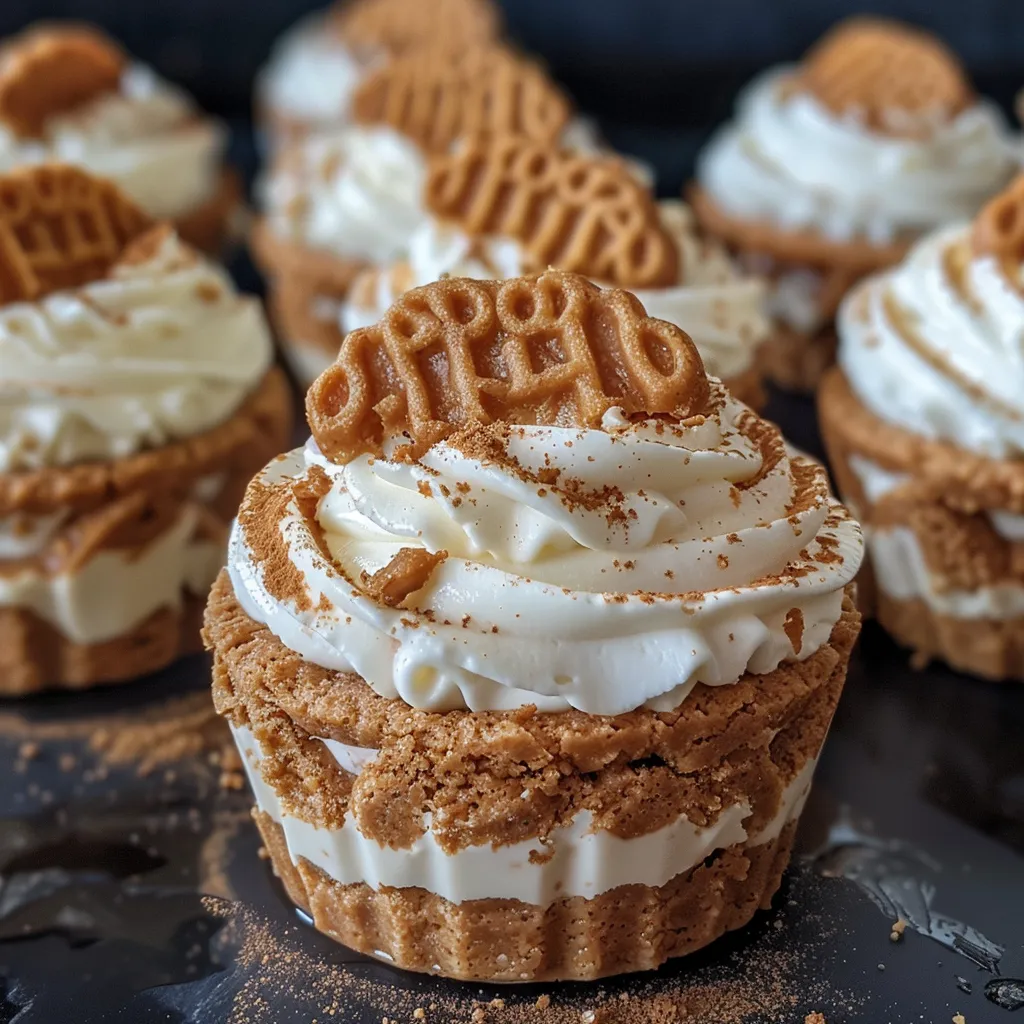
- 8 pieces Biscoff cookies (cut in half for garnish): Adds a visual appeal and a delicious crunch on top.
The Method: How to Make No-Bake Biscoff Cheesecake Cups
Now that we have our ingredients ready, let’s dive into the step-by-step process of creating these delightful cheesecake cups.
Step 1: Create the Crunchy Base
In a food processor, pulse the Biscoff biscuits until they resemble fine crumbs. Combine the crumbs with melted butter in a bowl and mix well until the crumbs are fully coated. Spoon the mixture into the bottom of each serving cup, pressing down firmly to create a solid base.
Step 2: Whip Up the Fluffy Cheesecake Filling
In a large mixing bowl, beat the cream cheese until smooth and creamy. Gradually add the powdered sugar and continue to mix until well combined. Pour in the Biscoff spread and vanilla extract, mixing until fully incorporated.
Step 3: Fold in the Whipped Cream
In a separate bowl, whip the heavy cream until stiff peaks form. Gently fold the whipped cream into the cheesecake mixture, being careful not to deflate the airiness. This step is crucial for achieving that light and fluffy texture.
Step 4: Assemble and Decorate
Spoon the cheesecake filling over the prepared biscuit base in each cup, using a spatula to smooth the tops. For a finishing touch, drizzle some warmed Biscoff spread over the top and garnish with half a Biscoff cookie. Chill in the refrigerator for at least 4 hours, or overnight for the best results.
Pro Tips for Perfect No-Bake Biscoff Cheesecake Cups
- Room Temperature Ingredients: Ensure your cream cheese is at room temperature to avoid lumps in your filling.
- Chill Time is Key: Don’t skip the chilling step; it helps the cheesecake set perfectly.
- Whipping Technique: When whipping your cream, start at a low speed and gradually increase to achieve the perfect peaks without over-whipping.
- Personalize Your Toppings: Feel free to add fresh fruits, chocolate shavings, or nuts for added texture and flavor.
- Flavor Variations: Experiment with flavored extracts like almond or lemon for a unique twist on the classic.
- Serving Temperature: Serve them chilled from the fridge for the best texture and flavor.
- Storage Tips: Keep leftovers covered in the fridge for up to 3 days.
- Batch Preparation: This recipe can easily be doubled for larger gatherings.
Common Mistakes and Troubleshooting
Even the best cooks can run into issues. Here are some common challenges and their solutions:
- Lumpy Cheesecake Filling: This often happens when the cream cheese is too cold. Always use room temperature cream cheese.
- Too Soft or Runny Mixture: Ensure your cream is whipped to stiff peaks and that you’ve chilled the cups adequately.
- Crust Falling Apart: Make sure the biscuit crumbs are well-coated in butter and pressed down firmly in the cups.
- Biscoff Spread Hardening: If your Biscoff spread is too thick, gently warm it in the microwave for 10 seconds to make it easier to drizzle.
Variations to Explore
Feeling adventurous? Here are a few fun variations you can try with your Biscoff cheesecake cups:
- Chocolate Drizzle: Top with melted chocolate for an indulgent twist.
- Fruit Layer: Add a layer of fresh berries or banana slices between the cheesecake and the crust for a fruity burst.
- Nutty Crunch: Mix in crushed nuts into the crust for added texture and flavor.
- Spiced Up: Add a pinch of cinnamon or nutmeg to the cheesecake filling for an extra layer of warmth and spice.
Storage and Make-Ahead Instructions
These no-bake cheesecake cups can be prepared ahead of time, making them an excellent choice for busy schedules. Here are some storage tips:
- Refrigeration: Store the cups in an airtight container in the fridge for up to 3 days.
- Freezing: If you want to make them further in advance, you can freeze the cheesecake cups (without toppings) for up to a month. Thaw in the refrigerator overnight before serving.
- Make-Ahead Assembly: You can prepare the crust and filling separately and assemble them a day before serving for optimal freshness.
Comprehensive FAQ
- Can I use different types of cookies? Absolutely! Any spiced cookie can be used for the crust.
- Is it necessary to use Biscoff spread? While it’s the star ingredient, you can substitute with other cookie spreads, but the flavor will differ.
- How long do I need to chill these cups? For best results, chill for at least 4 hours or overnight.
- Can I make these vegan? Yes! Use plant-based cream cheese and whipped coconut cream.
- What if I don’t have heavy cream? You can substitute with a whipped topping or coconut cream for a dairy-free option.
- Can I make these in advance? Yes, they are perfect for make-ahead desserts!
- How do I know when they are set? They should be firm to the touch and hold their shape when removed from the cup.
- Can I add more sugar? You can adjust the sweetness to your liking, just taste as you go!
Nutritional Tips and Dietary Adaptations
For those watching their dietary intake, here are some tips:
- Lower Sugar Option: Use less powdered sugar or a sugar substitute to reduce calories.
- Gluten-Free: Ensure the biscuits used are gluten-free for those with gluten sensitivities.
- High-Protein Version: Consider adding Greek yogurt to the cheesecake filling for extra protein.
Essential Equipment for Preparation
To make your baking experience smooth and enjoyable, here are some essential tools you’ll need:
- Food Processor: For easily crushing the biscuits.
- Mixing Bowls: Having a few different sizes will help with mixing ingredients.
- Measuring Cups and Spoons: Accurate measurements are key to a perfect recipe.
- Whisk or Electric Mixer: For whipping the cream to perfect peaks.
- Spoon or Spatula: For layering and smoothing the cheesecake filling in the cups.
Serving Suggestions
When it comes to serving your No-Bake Biscoff Cheesecake Cups, presentation is key! Here are some delightful suggestions:
- Serve in Individual Cups: Use clear cups to showcase the beautiful layers.
- Add Fresh Fruits: Serve with a side of fresh berries for a refreshing contrast.
- Pair with Coffee or Tea: A warm beverage complements the creamy cheesecake flavors beautifully.
- Garnish with Mint: A sprig of mint adds a pop of color and freshness.
In conclusion, making these No-Bake Biscoff Cheesecake Cups is an adventure that celebrates flavors, textures, and the joy of sharing sweet moments with loved ones. So gather your ingredients, roll up your sleeves, and join me in creating a delightful dessert that will transport you straight to flavor paradise. Happy cooking!
No-Bake Biscoff Cheesecake Cups
Ingredients
Crust
- 30 pieces Lotus Biscoff biscuits
- 2 tablespoons unsalted butter (melted)
Filling
- 16 oz heavy cream
- 8 oz cream cheese (at room temperature)
- 1/2 cup powdered sugar
- 1 cup Biscoff spread
- 1 teaspoon vanilla extract
Topping & Garnish
- 1/2 cup Biscoff spread (for drizzling on top)
- 8 pieces Biscoff cookies (cut in half for garnish)
Instructions
- Crush Biscoff biscuits and mix with melted butter to form the crust. Press into the bottom of cups.
- Beat heavy cream until stiff peaks form.
- Mix cream cheese, powdered sugar, Biscoff spread, and vanilla until smooth. Fold in whipped cream.
- Spoon filling into cups over the crust. Chill for at least 2 hours.
- Drizzle Biscoff spread on top and garnish with halved Biscoff cookies before serving.